Many people have gone out and purchased an iPod Shuffle, or Nano. Both of these portable media players are quite nice and very sleek. It seems that all of the kids have to have one these days. However, whether it is your own iPod or your child’s there are a few occasions where you might find that you have a need to backup the music and videos stored on your device.
The most common trouble I have come across is when a PC gets a virus, hard drive fails, or some other catastrophic malfunction happens where the Operating System must be reinstalled. Another instance might be where the user has purchased a new computer and the old computer was discarded without saving the iTunes library first. Believe me it happens and we all make little mistakes that we regret later. These are issues where the entire iTunes library might not be recoverable and inevitably the iPod must be synced. Unfortunately, when syncing your device through the iTunes software it will erase all media files on your iPod and then there is no way to recover them. In this tutorial I will explain a simple way in which you can backup your music files on your device to your PC before you sync it with iTunes.
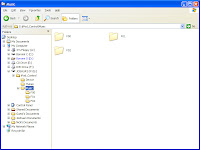
 Personally, I like to have my system and hidden files visible at all times it is just my preference. Nevertheless, in order for you to see your device as a removable drive and see its contents you must first plug the device into your USB port. Now, you must have your system and hidden files visible, so here is how you do it. First open Windows Explorer by going to “Start,” “All Programs,” “Accessories,” “Windows Explorer.” From the menu items at the top of Windows Explorer you will need to go to “Tools,” “Folder Options,” click on the “View” tab and then scroll down to where it says “Show Hidden Files and Folders,” then click on the bubble to select this option, once that is done go ahead and click the “OK” Button. Now you will be able to see your iPod as a removable disk and you will be able to copy files from it.
In the iPod shuffle you will see “iPod_Control” and then “Music” and some folders that may be labeled as F00, F01, F02, or some other combination and it is possible that you may have more depending upon how much you have stored on your device. Unfortunately, I do not have an iPod Nano to use in this tutorial, but I do know that the file structure is similar and you should be able to navigate to the music and video files with little or no trouble. As for myself I find it simpler to just copy the entire Music folder to My Music folder. The one thing that you must know is that the files you have copied to your hard drive cannot be copied directly back to the device. These files must be processed by the iTunes software.
First, remember those folders that you copied to your “My Music” folder? Well, now you must navigate to them and change their attributes. Do not worry it is not as scary as it sounds. Simply go to “Start” “My Music” and right click on the “Music” folder. Then from the popup menu click on properties. Then make sure that the “Read Only” and “Hidden” checkboxes are unchecked then click “Ok.” Then you will want to click on the radial button that reads “Apply changes to this folder, subfolders and files.” Now these files can be processed by the iTunes software and just in case you do not care for the way they are named and you cannot recognize the names of your MP3s, do not fear, iTunes will rename them for you to their original and recognizable names.
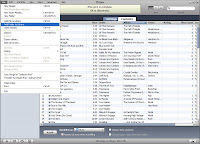
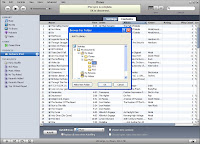
 Alright, now it is time for the big moment, go ahead and open up the iTunes program. The software will ask if you want to sync your iPod, go on and click sync and erase. Pay attention to the top status window for the operation to complete. Once your iPod is synced with the iTunes software, you may now start repopulating it with your saved media files. To do so, all that you have to do is go to the menu items in iTunes, click on “File” and then click on “Add Folder to Library.” You will then be presented with a little navigation window.
  Go ahead and expand the plus sign next to your “My Documents” folder, then your “My Music” folder and then highlight your F00 folder or whatever one of the first folders you may have your MP3s in. Once you do this iTunes will process all of the MP3s by renaming them and then it will load them onto your iPod. The process can take some time depending on how many media files you have. You must add all of the folders containing your media files to the iTunes library.
I hope that this tutorial has been helpful and that it may have given some insight into other things that you might be able to do with your iPod and PC combo. It is possible that there might be some third party software that might be available to do this for you. However, if you are like me you do not want to pay for some software that does what you can do yourself and you certainly do not want to install any free software on your PC that might contain Trojan viruses and Spyware then this is the way to go.

Leave Your Comments