The fish finder units are very helpful devices for all kinds of people who love water: divers, fishermen, anglers. This article will show you how to read a fish finder screen.
They have become more popular recently. If you do not know anything about them yet, you might try to research them and buy a good product that can bring the functions you want. Once you choose which one you want, the next thing you will need to do is to install it. It is a very complicated process and setting up the unit might be difficult, but do not think that is the most difficult part yet.
If you want to catch anything, you need to fully understand the information shown on the screen. Whether you know the way to interpret a finder screen, there is no need to be ashamed. There are many anglers who are very experienced but they have never seen a finder in their entire life, especially the ones with sonar technology. Reading a fish finder could be complex, but it is very crucial to know this before you buy one.
Speed Sensors, Temperature, Depth

It is crucial to learn how fish finders work before you could read it. Sonar signals are emitted into the water from your transducer unit. They travel around and go back into the transducer. Your transducer unit will read the data that indicates the distance, speed of the signal. It then will be converted and display as visual data like arches, colored lines.
A lot of fish finder units contain a depth measurement sensor in the transducer so you can know how deep where your boat is. This information then could tell you what fish the water has or it could be useful in general. The temperature sensor can tell you what the temperature of the water is to locate some specific fish.
Another helpful thing on your transducer is your speed sensor. It displays how quick your boat is moving, just like the speedometer. Be familiar with them, they are useful even for experienced fishermen as knowing details about where you go fishing is always important.
Color and Return Signals Strength

Some fish finder unit supports gray scale only, while some provide you color screen. The color in the screen is related to the strength of the return signals to your transducer. Whether a structure is hard or its density is very
important information in the return signals. Strong return signals will result in stronger or darker color on the display screen.
The bottom of pond, river, lake, etc. will be a bold line, thick or light, thin line. If the material of the bottom ground is harder, the screen will display bold, thicker lines. And the softer material will result in the lighter lines.
Do not overlook those little details as knowing the way to read and use all the information the fish finder could bring will increase your fishing skill in general.
Data Display Direction

Once you understand that something like color, while may seem insignificant, plays a big role in displaying the information your sensors collect, you could begin trying to read your fish finder unit results. First, you need set up the fish finder then move slowly around with your boat. Follow your fish finder unit and remember the speed with which you are comfortable. Get familiar with the screen and its display process.
Most units will display the best results at a low speed depending on how they are mounted and how the sonar waves are emitted. Some units will display the optimal results depending on different speeds. When you are familiar with having a unit on your boat, try to manipulate the screen, go to the optimum speed, then try more specific steps.
As opposed to the way you read books, your fish finder unit will display the results in the direction from your right side to your left. The recent results are displayed on the right of your screen, meaning you will get a stable image once you can stay still. You can zoom on the area you want to concentrate on a region.
Fish ID

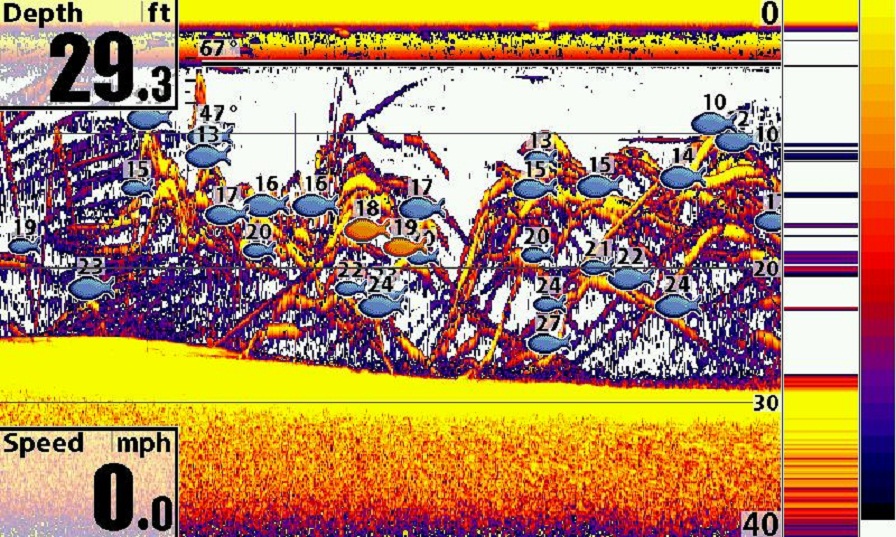
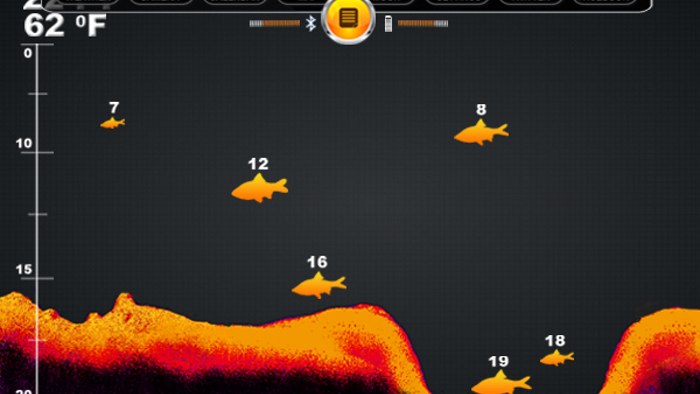
The next step is understanding how fish, objects, schools or structure look like in the fish finder. When the return signals come back to your transducer, your fish finder unit will have two ways of displaying them. Either it will just show you on the screen the raw and actual data or there is a program that will convert it into small, easy to identify icons.
This technology to display what type of fish the fish finders see is called Fish ID. It is invented to help angles have a better, friendlier and simpler user interface. The actual fish will result in small fish icons, in different sizes. Some sophisticated fish finders even have icons for plants and rocks. You will just need to look at the icons you want, interpret the depth information and then cast! It is just simple.
But there is a big sacrifice as Fish ID tends to be less accurate. This could be irritating as they can show you a plant instead of a rock. But if want to have more time casting, you should learn how to use this technology.
Arch, Raw Data Fish Finders
The alternate display mode is the arch, raw data fish finders, they just simply show you what your transducer receives: arches and lines. It has a steep learning curve but once you are familiar with it, a great amount of time can be saved.
Stationary objects are read as lines and a moving targets are read as arches by sonar signal. Fishes will be interpreted as arches, bigger fish will result in bigger arches. Rocks and plants will be difficult to recognize, but when you are familiar with the process, your raw data fish finder will be more correct and bring more great results.

Great article and interesting, thank you for sharing.
Make a more new posts please 🙂